
Hi!
During the past few years I’ve been experimenting with different kinds of smoking and grilling – I was using mangal (a mediterranean version of the charcoal grill), grill, gas grill, water smoker, brazilian style parija… One thing I didn’t get into was the cold smoking. But now, when I did – wow, I love that! So today I will be showing my new UFO Cold Smoke generator and making a homemade cold smoked salmon and cold smoked cheese.
So, to begin with, cold smoking, unlike the hot smoking, aka barbecuing, does not actually cook the food you’re smoking. In fact, this process is merely a way to add flavor or preserve food by exposing the products to the smoke from wood. As its first step, cold smoking process requires curing, and that is because the smoke only penetrates the surface of the food, and leaves the core/centre of the food unaffected. That’s why curing is necessary to prevent any bacteria from growing in the smoked food, including such a horrible one as botulism.
Basically, cold smoking can be done with any device, ensuring a safe distance between the smoke source and the smoke chamber, allowing the smoke to cool to a temperature below 25C (75F). However, using a cold smoke generator is so much easier and more convenient. There are few such smokers on the market, and the one I chose was the UFO Cold Smoker Creat0r. Its way of work is as simple as it can get – slowly smoldering wood chips, air pump (small one, the kind you would use as an air supply for an aquarium), and here you go – 7-9 hours of cold smoke on a full load. My initial idea was to use a 2 meters long tube, but it turned out that the airflow was seriously screwed by it and the fire got choked. Quick chat with Trevor, the man behind the UFO Cold Smoke Creator in Australia, pretty much resolved the issue. I got it directly mounted on a 20$ Jumbuck kettle and it worked like charm!


The package included 2 kg of birch chips, and I can say 500 g is enough to smolder for about 16-18 hours.
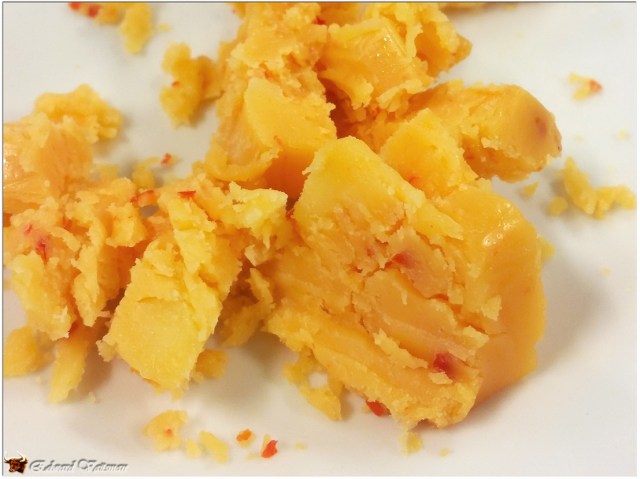
So, cheese smoking… One of the easiest things to do. Set the smoker up, throw the cheese in and give it about 60-80 minutes of strong smoke. Then – pull it out, wrap in a plastic wrap or vacuum pack it for another 5-7 days to let the smoke taste penetrate the cheese, slice and enjoy! Here’s some smoked aged cheddar with hot chili, crumbled:
And here’s what was going on in the smoker, when I had some provolone dolce, kashkaval and sliced cheddar.

Done smoking – wrapping up with cling wrap to sit in the fridge for a week, so all the flavors penetrate the cheese as deep as it can go…

Finally, smoked provolone dolce cheese cubed and ready… What a treat!

And now the really cool part. I don’t know about you, but I love good smoked salmon. I used to buy it, that vacuum packed Norwegian salmon, cold smoked, but now I can proudly say I can make it at home, cheaper and way more tasty. So, here’s the ingredients:
- 1 whole salmon fillet – about 1.3-1.5 kg (3-4 lb), skin on
- 1.5 cups salt
- 1.5 cups brown sugar
- 2 tsp ground black pepper
- 1/2 bunch of fresh dill (or dried – works equally good)
- 2 tbsp maple syrup
- 300 g wood chips (any hardwood or fruitwood, I used birch)
Step 1 – curing. In the bowl mix well the salt, brown sugar and black pepper. If using dried dill or herbs – mix them in now as well. Otherwise – leave the fresh dill aside for the moment.
Place about 1/3 of the curing mix amount in a shallow baking dish big enough to hold the whole fillet. Make sure it is spread in a thin layer. Lay the salmon skin side down on the curing mix in the baking dish, then cover equally with the rest of the cure. Don’t worry, it won’t be salty at all. Once covered, tear the dill by hands and spread over the curing mix. Cover with cling wrap and refrigerate for at least 24 hours, or even 48.
Step 2 – preparing for smoking. As a first step we need to rinse the fish to get rid of all the excessive cure. Then place the fish on the wire rack skin side down and let dry in the refrigerator for 4-5 hours, until it feels a bit tacky to touch. Finally, just before smoking it, apply a thin layer of maple syrup to give that hint of sweetness to the fish.
Step 3 – smoking. Load the chips into the smoker. There is no need to soak them, the structure of the smoke generator will maintain slow smoldering and won’t let the chips burn. Light it, and let the fish smoke for about 3-4 hours.
Note here – in conventional smokers the time is about 12 hours, but here the smoke turns out to be so dense it takes 3-4 hours to reach the ultimate taste. Besides, it’s not like you wanna keep it for months – trust me, it’s so tasty it’ll be gone in no time!
Here’s how it turns out.
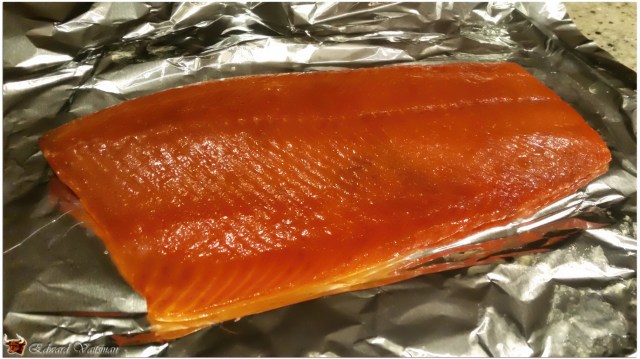
Now wrap in the plastic wrap or vacuum seal it and let sit in the refrigerator for at least 3-4 hours or overnight. Once rested well – here’s the result.
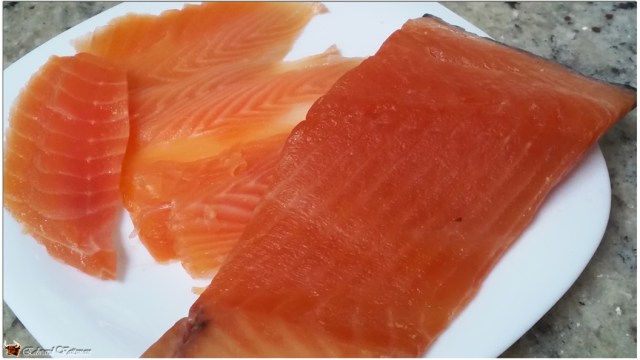
Now you can either enjoy it as is, or as I did – with some cream cheese in the wrap.
Till the next time,
Have a great smoke! 🙂
