
Few days ago a friend of mine celebrated his 40th birthday. Boy, what a surprise party he got… I had the pleasure and the honour to be among the “chefs” on that party, and this cake was the grand finale. Let me tell you, no one succeeded to resist the temptation of “The dark side”…
This recipe is going to be not simple. However, once you understand its stages and the process, you’ll easily get to the same results – trust me, this was my 2nd time ever I tried this technique, so it is all about being precise, following the recipe and not seeking shortcuts. 🙂
To begin with, you must start the process 3 days before the date you want to serve it. The reason is this cake requires at least 2 rounds of deep freezing, and that takes overnight.
Order of assembly
Use a spring form of at least 26 cm (10”) for assembling. Lay it with the acetate cake wrap and also lay the base with baking parchment. Note we will assemble the cake upside down, and that’ll be for a reason.
- Half of the mousse goes in, spread all over the base of the form (another half – store in the pastry bag, you will need it later). Layer thickness – about 1 cm or so (1/2”). Freeze for 30-40 minutes.
- Lay the base on the mousse (it’ll be firm enough after freezing to hold the weight of the base without letting it sink). Use the mousse in the pastry bag to fill tightly the space between the base and form sides. When I say tightly, I mean you don’t want to have any cracks or air bubbles in it. Use spatula where needed. Freeze overnight.
- Right after putting the form with the cake and the mousse to the fridge, make the glaze, cover with the plastic wrap and let stand in room temperature overnight.
- Glaze the cake, transfer to the cake board and let sit in the fridge for at least 6-7 hours to defrost.
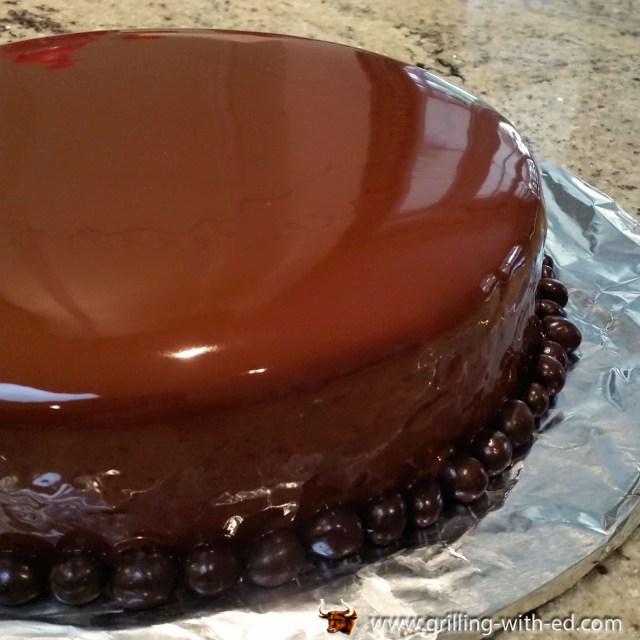
I know, sounds long and exhausting, but hey! Look at the photo. Ain’t it worth it?!
Ok, so… the base is nothing but a cake I already posted – the “drunk” cherry brownie. Just click on this link and follow the baking steps with one small change – you will need a spring form which is at least 2.5 cm (1”) smaller than the form you will use for assembling the cake. Reason – you want to have some space between the sides of the form and the base, so you could feel it with the mousse. This cake was assembled in the 28 cm (about 11”) form and the base was baked in 24 cm (9 ½”) form, allowing 2 cm (4/5”) gap to be filled with the mousse.
White chocolate mousse
- 300 g white chocolate
- 600 g whipping cream
- 60 g icing sugar
- 50 ml milk
Preparation
- Melt the chocolate with the milk. The professional way is to use a bain mari, but frankly, too much effort for this cause. Simply put the bowl with the chocolate and milk in the microwave for 2 minutes. It’ll melt like a charm!
- Using a hand or a stand mixer whip the cream to stiff peaks. That is, when you can turn the bowl over above your head and not end up covered in whipped cream J. Once done and the melted chocolate has cooled a bit, gently fold the melted chocolate into the whipped cream and chill in the fridge until ready to use.
Dark chocolate mirror glaze
- 300 g of 70% dark chocolate
- 200 g of sweetened condensed milk
- 300 g of caster sugar
- 300 g of glucose syrup
- 150 ml of water
- 20 g gelatine powder
- 120 ml water
Preparation
- The gelatine mixture. Mix together in the big bowl 120 ml of water and 20g of gelatine powder. Put aside. Break the chocolate into small cubes and prepare the condensed milk.
- Sugar and glucose syrup. Place the sugar, glucose and water in a small saucepan and heat, stirring constantly, until it reaches the temperature of 103C (i.e. just begins to boil, but I strongly suggest using the thermometer).
- Place the chocolate and the condensed milk in the same bowl with gelatine mixture and pour the hot syrup over. The heat will melt the chocolate within 4-5 minutes.
- Once chocolate melted, you will need the stick blender to process the mixture until smooth and shiny. Submerge the stick blender head about 2/3 of the depth of the mixture and start processing, without moving the blender. It is very important, since if you start moving it around you’ll incorporate an enormous amount of air bubbles into the mixture, and that is the last thing you want to do when preparing a mirror glaze.
- Cover the mixture with the plastic wrap in a way it’s touching the mixture surface – this will prevent the glaze from getting the crust on the top. Let stand in the room temperature overnight – that is to let the gelatine gain its full strength.
Next morning, when the glaze cools, it’ll have the consistency of a jelly, and that’s perfectly fine. All you need to do is to reheat it in the microwave for about 1.5-2 minutes, and then use your stick blender again, same way you’ve done it the night before, 2/3 depth submerged, to get the glaze to the smooth and shiny consistency, trying not to create a lot of air bubbles. The glaze is ready for use once it cools down to 31-32 C.
Glazing
Get your rack and the drip tray ready, as well as your glaze. Once done, take the cake out of the freezer, remove it from the spring pan and take the acetate slide off. Then flip the cake over, having the side which was facing the base of the form up. If you followed all the instructions, you should end up with a perfectly levelled top and sides. Just slide your finger on the edge to make it smoother, and place on the rack inside the dripping pan.
Slowly pour the glaze over, working your way from the middle of the top side. The cake is stone frozen, so the glaze will settle almost instantly – the gelatine will stop it from dripping off. Obviously a lot of the glaze will end up in the dripping tray (so have it big enough!) but the thin, shiny gloss will remain on the cake giving it the sexy mirror finish. Let it sit for 4-5 minutes until the glaze has settled, and then use your spatula to remove all the hanging drops. Transfer the cake to the cake board – and off it goes to the refrigerator overnight.
Wow… I think this was the longest recipe I’ve ever posted, but trust me, it’s absolutely worth it!
Enjoy!
